Access Management in Pigment: A 5 Step Guide
Access Management in Pigment: A 5 Step Guide
Access Management in Pigment: A 5 Step Guide

Rasagya Monga
Rasagya Monga
Rasagya Monga
Aug 5, 2024
The management of security and permissions is one of the most important factors to consider when evaluating, building or administering any enterprise system. This is an important consideration regardless of the size of the business but becomes especially relevant as your business scales and has to meet compliance requirements (eg. SOX). In this blog, we cover how Pigment manages data security and permissions and how to set up the right foundation for success.
Before we dive into the details, here are a few concepts to keep in mind:
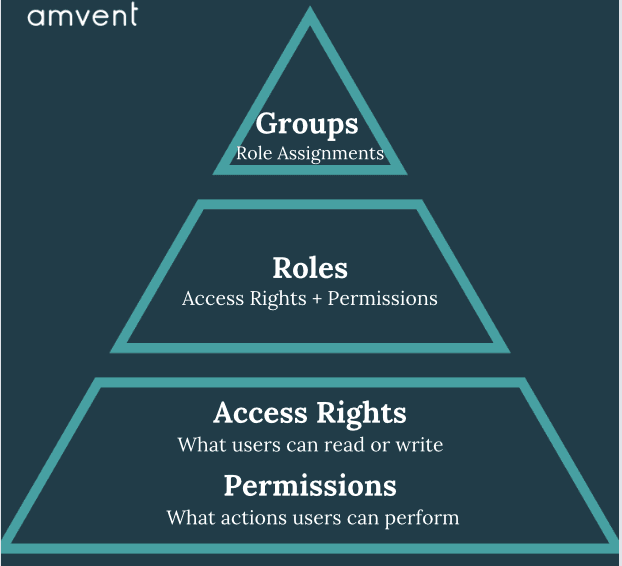
Access Rights: Control what data a user can see and edit (Read / Write)
Permissions: Control what actions a user can perform
Roles: Apply a set of Access rights and permissions
Groups: Apply Roles (which contain underlying Access rights and permission settings) to multiple users at once
Now that we have a high level understanding of key terminology, let’s look at a 5-step process to set up the right security foundation for your Pigment Applications:
Step 1: Create a Security Administration board to centralize required grids and lists
Create a board in your primary source Application (eg. Data Hub) which contains all of the Grids and Lists required to manage security. We can call this the Security Administration board.
Each Pigment Application comes with its own list of Roles. Within these Lists are sets of Permissions (what actions a User can perform) and Access rights (what information a User can see or edit). On your Security Administration board, publish the Role Dimension Lists across all key Hub and Spoke Applications.

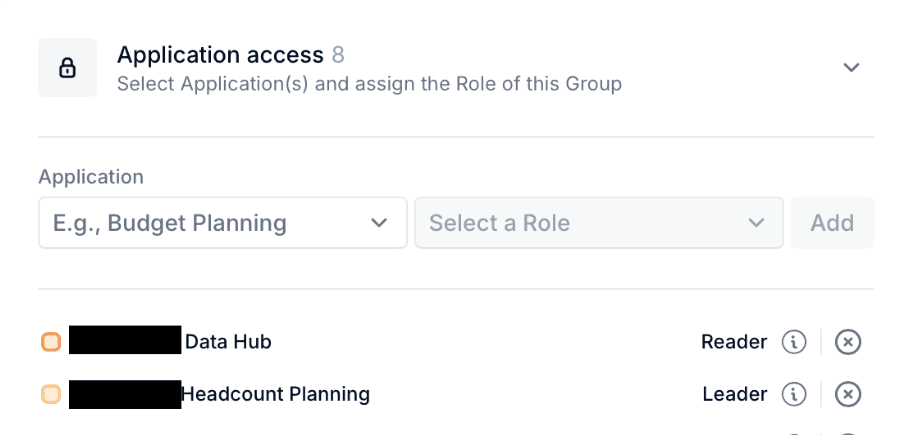
Step 2: Create Groups for Role assignments
Once you have established the right set of Roles, create Groups in order to assign Roles for each key Application. In other words, Groups help you assign Access Rights and Permissions (through Roles) across multiple Applications and for multiple Users.
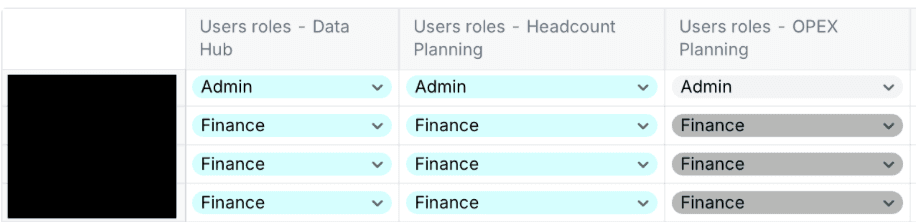
Step 3: Ensure Users are assigned to appropriate Groups
This can be done through Members Management or by creating a Table of Roles across all Applications. To create this Table, simply use the Users Roles metric created by Pigment once a User is added to a Group. Make these Metrics sharable across all key Applications, add them to a Table and publish on the Security Administration Board:
Step 4: Confirm Board Access Configurations for each Group
Create Board Access configurations in order to determine which Roles can view, comment on, or edit certain boards. This will require 3 sub-steps:
Step 4.1: Create a Metric to stage Permissions by Role.
Step 4.2: Create a Metric to pull Permissions from Step 4.1 by User.
Step 4.3: Use Metric created in Step 4.2 and create a Board Access Configuration to assign specific boards.
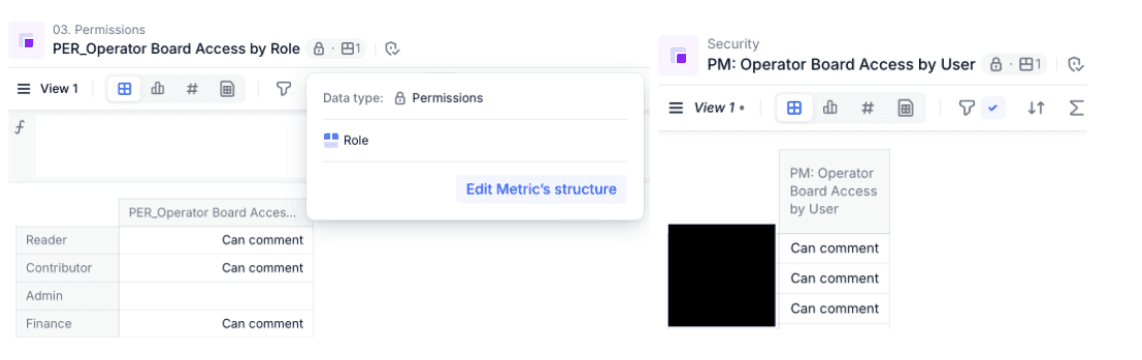
Publish these metrics to the Security Administration board created in Step 1 in order to keep everything centralized.
Step 5: Create Data Access Configurations for key dimensions and assign individual User Access
This is one of the most important steps in your Access Management set up. Before setting up your Data Access Configuration, here are a few prerequisites:
Prerequisite 1: Identify the Dimension Lists upon which you would want to apply Access Rights (Eg. Cost Centers, Products, Locations, etc.)
Prerequisite 2: Identify sensitive fields (List Properties or Metrics) that need to be protected (Eg. Salary information)
Once you have identified the prerequisites, create two sets of Read / Write metrics (Boolean) by User and by the Dimension List to be secured. These can then be added into a table which will be used to toggle Access Rights on or off (Read / Write) for each List Item by User.
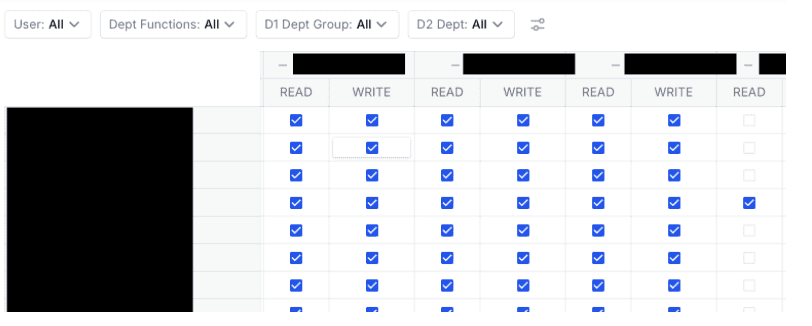
Repeat this process for multiple dimensions for tighter security. Additionally, you can create similar Read / Write Metrics for specific sensitive information (eg. Salary) that can be applied on top of these other underlying Metrics. For instance, a user might be able to access information related to a specific Cost Center but may not need access to view Salary information. In this case, creating multiple Metrics to control Dimension List access along with Salary access can be useful.
Publish these metrics to the Security Administration board created in Step 1 in order to keep everything centralized.
Note: You can choose to create these access rights metrics in your hub application or you could recreate the metrics for each spoke application. We recommend the latter for more flexibility.
Once all 5 steps are completed, managing Access for each User can be done by:
Assigning Single-Sign-On: This will help users access Pigment in a secure manner.
Adding Users to Groups: This will help assign sets of permissions (through Roles) across multiple Applications at once.
Assigning specific Dimension List and Metric Access by User (centralized in the Security Administration board): This will help protect sensitive data and ensure Users can only access information that they are allowed to see.
Pigment’s Access Management is best-in-class and provides flexibility at enterprise-scale allowing for dynamic controls and an intuitive set up. For a more in-depth overview of key Pigment functionality, check out our other blogs on Sparsity Management and Pigment’s key differentiators compared to other legacy EPM solutions. Want to learn more? Chat with us!
The management of security and permissions is one of the most important factors to consider when evaluating, building or administering any enterprise system. This is an important consideration regardless of the size of the business but becomes especially relevant as your business scales and has to meet compliance requirements (eg. SOX). In this blog, we cover how Pigment manages data security and permissions and how to set up the right foundation for success.
Before we dive into the details, here are a few concepts to keep in mind:
Access Rights: Control what data a user can see and edit (Read / Write)
Permissions: Control what actions a user can perform
Roles: Apply a set of Access rights and permissions
Groups: Apply Roles (which contain underlying Access rights and permission settings) to multiple users at once
Now that we have a high level understanding of key terminology, let’s look at a 5-step process to set up the right security foundation for your Pigment Applications:
Step 1: Create a Security Administration board to centralize required grids and lists
Create a board in your primary source Application (eg. Data Hub) which contains all of the Grids and Lists required to manage security. We can call this the Security Administration board.
Each Pigment Application comes with its own list of Roles. Within these Lists are sets of Permissions (what actions a User can perform) and Access rights (what information a User can see or edit). On your Security Administration board, publish the Role Dimension Lists across all key Hub and Spoke Applications.
Step 2: Create Groups for Role assignments
Once you have established the right set of Roles, create Groups in order to assign Roles for each key Application. In other words, Groups help you assign Access Rights and Permissions (through Roles) across multiple Applications and for multiple Users.
Step 3: Ensure Users are assigned to appropriate Groups
This can be done through Members Management or by creating a Table of Roles across all Applications. To create this Table, simply use the Users Roles metric created by Pigment once a User is added to a Group. Make these Metrics sharable across all key Applications, add them to a Table and publish on the Security Administration Board:
Step 4: Confirm Board Access Configurations for each Group
Create Board Access configurations in order to determine which Roles can view, comment on, or edit certain boards. This will require 3 sub-steps:
Step 4.1: Create a Metric to stage Permissions by Role.
Step 4.2: Create a Metric to pull Permissions from Step 4.1 by User.
Step 4.3: Use Metric created in Step 4.2 and create a Board Access Configuration to assign specific boards.
Publish these metrics to the Security Administration board created in Step 1 in order to keep everything centralized.
Step 5: Create Data Access Configurations for key dimensions and assign individual User Access
This is one of the most important steps in your Access Management set up. Before setting up your Data Access Configuration, here are a few prerequisites:
Prerequisite 1: Identify the Dimension Lists upon which you would want to apply Access Rights (Eg. Cost Centers, Products, Locations, etc.)
Prerequisite 2: Identify sensitive fields (List Properties or Metrics) that need to be protected (Eg. Salary information)
Once you have identified the prerequisites, create two sets of Read / Write metrics (Boolean) by User and by the Dimension List to be secured. These can then be added into a table which will be used to toggle Access Rights on or off (Read / Write) for each List Item by User.
Repeat this process for multiple dimensions for tighter security. Additionally, you can create similar Read / Write Metrics for specific sensitive information (eg. Salary) that can be applied on top of these other underlying Metrics. For instance, a user might be able to access information related to a specific Cost Center but may not need access to view Salary information. In this case, creating multiple Metrics to control Dimension List access along with Salary access can be useful.
Publish these metrics to the Security Administration board created in Step 1 in order to keep everything centralized.
Note: You can choose to create these access rights metrics in your hub application or you could recreate the metrics for each spoke application. We recommend the latter for more flexibility.
Once all 5 steps are completed, managing Access for each User can be done by:
Assigning Single-Sign-On: This will help users access Pigment in a secure manner.
Adding Users to Groups: This will help assign sets of permissions (through Roles) across multiple Applications at once.
Assigning specific Dimension List and Metric Access by User (centralized in the Security Administration board): This will help protect sensitive data and ensure Users can only access information that they are allowed to see.
Pigment’s Access Management is best-in-class and provides flexibility at enterprise-scale allowing for dynamic controls and an intuitive set up. For a more in-depth overview of key Pigment functionality, check out our other blogs on Sparsity Management and Pigment’s key differentiators compared to other legacy EPM solutions. Want to learn more? Chat with us!
About the Author
About the Author
About the Author
Rasagya is an experienced EPM systems advisor and solution architect, with a background in Corporate Finance and Consulting. Prior to founding Amvent, Rasagya led the EPM transformation journey at Gusto, helping the business transition successfully from Anaplan to Pigment, with 200+ users and an incredibly positive system adoption. Before Gusto, Rasagya was a Senior Consultant at Spaulding Ridge, a leading Anaplan partner. Having worked in Finance and Consulting, Rasagya is able to combine business operations knowledge with systems expertise to help customers in the best way possible.